Clearing Codes in Automotive Repair: A Beginner’s Guide
Introduction
In the modern automotive repair industry, cars are equipped with sophisticated computer systems that monitor various vehicle functions. When a problem occurs, these systems generate error codes that trigger dashboard warning lights, alerting drivers to potential issues. Clearing these codes is a crucial step in the repair process, allowing technicians to ensure the vehicle has been properly fixed. In this beginner’s guide, we will delve into the concept of clearing codes, its importance, and how it can be done using general tools.
Understanding Error Codes
Before we dive into clearing codes, let’s understand what error codes are and how they are generated. In today’s vehicles, there are multiple sensors and modules that constantly monitor engine performance, emissions, transmission, and other vital systems. When these sensors detect a problem or deviation from normal operation, they send a signal to the vehicle’s onboard computer (ECU). The ECU interprets this signal and generates an error code, which corresponds to the specific issue detected.
The Importance of Clearing Codes
Clearing codes is more than just turning off the dashboard warning lights. It plays a critical role in the automotive repair process for several reasons:
- Accurate Diagnosis: When a problem occurs in a vehicle, it may trigger multiple error codes. By clearing the codes after each repair, technicians can pinpoint the specific issues that still persist, enabling them to make accurate diagnoses and fix the underlying problems effectively.
- Monitoring Vehicle Health: Clearing codes allows technicians to monitor the vehicle’s health over time. If the same error code reappears frequently, it indicates an unresolved issue that requires further attention.
- Enhanced Vehicle Performance: Some error codes may cause the vehicle’s performance to be compromised. By clearing these codes, the vehicle’s systems can function optimally, resulting in improved fuel efficiency and overall performance.
Clearing Codes Using Tools
Clearing codes can be done using general tools available in most automotive repair shops.
Here’s a step-by-step guide to help you clear codes like a pro:
Step 1: Identify the Issue Before attempting to clear any codes, it’s essential to diagnose and address the root cause of the problem. Otherwise, the codes will likely reappear after being cleared.
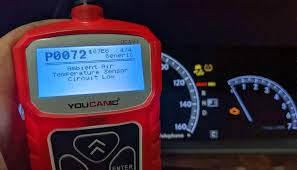
Step 2: Obtain an OBD-II Scanner An On-Board Diagnostics (OBD-II) scanner is a handheld device that reads and clears error codes. You can purchase one from an auto parts store or borrow one from a friend or colleague.
Step 3: Locate the OBD-II Port The OBD-II port is usually located under the dashboard on the driver’s side of the vehicle. It might have a cover labeled “OBD” or “Diagnostics.”
Step 4: Plug in the OBD-II Scanner Connect the OBD-II scanner’s cable to the port firmly. Turn the vehicle’s ignition key to the “On” position without starting the engine. The scanner will power on automatically.
Step 5: Read and Clear Codes Follow the on-screen instructions on the OBD-II scanner. Select the “Read Codes” option to retrieve the error codes from the vehicle’s computer. Take note of the codes displayed.
Step 6: Clear the Codes Once the issue has been addressed, select the “Clear Codes” option on the scanner. Confirm your choice, and the scanner will communicate with the ECU to erase the codes.
Step 7: Verify Code Clearance After clearing the codes, turn off the vehicle’s ignition and wait for a few seconds. Turn the ignition back on and re-scan the system to ensure that the codes have been successfully cleared.
Conclusion
Clearing codes is a fundamental skill in automotive repair, ensuring that vehicles are thoroughly diagnosed and repaired before they leave the shop. By using general tools like an OBD-II scanner, even beginners can clear error codes and contribute to safe and reliable vehicles on the road. Remember always to diagnose and address the root cause of the issue before clearing codes to ensure effective repairs. Happy repairing!
What does clearing codes mean?
Clearing codes refers to the process of erasing the stored error codes or diagnostic trouble codes (DTCs) from a vehicle’s onboard computer system, known as the Engine Control Module (ECU) or Powertrain Control Module (PCM). These codes are generated when the vehicle’s sensors detect a problem or malfunction in various systems, such as the engine, emissions, transmission, or other critical components.
When an issue is detected, the ECU records the specific error code(s) associated with the problem. These codes trigger warning lights on the vehicle’s dashboard, such as the check engine light, to alert the driver that there might be a problem that requires attention.
Clearing codes is a necessary step in the automotive repair process, and it serves several important purposes:
- Resetting Dashboard Warning Lights: Clearing the codes turns off the dashboard warning lights that were illuminated due to the detected issues. This can be done once the underlying problem has been diagnosed and fixed.
- Ensuring Accurate Diagnosis: By clearing the codes after each repair, technicians can determine if the issue has been successfully resolved. If the problem persists, the same error code will reappear, indicating that further investigation and repairs are required.
- Monitoring Vehicle Health: Regularly clearing codes allows technicians to monitor the health of the vehicle over time. If the same error code reoccurs frequently, it indicates a persistent problem that needs to be addressed.
- Improving Vehicle Performance: Some error codes may cause the vehicle’s performance to be compromised, leading to reduced fuel efficiency or drivability issues. Clearing these codes can restore the vehicle to optimal performance levels.
It’s important to note that clearing codes should not be used as a quick fix for unresolved issues. Technicians must diagnose and fix the root cause of the problem before clearing the codes to ensure safe and reliable vehicle operation.
Clearing codes is typically done using a diagnostic tool, such as an OBD-II scanner, which connects to the vehicle’s OBD-II port. Once connected, the scanner communicates with the ECU to read and clear the stored error codes. After clearing the codes, the technician can verify if they have been successfully erased by rescanning the system.
In summary, clearing codes is a vital process in automotive repair, allowing technicians to confirm that repairs have been effective and providing a way to monitor the health of the vehicle’s systems over time.
How long to wait after clearing codes?
After clearing codes, you typically need to drive for about 50 to 100 miles. During this time, the vehicle’s computer system monitors sensors and registers results. The warning light may still be on initially until the computer confirms that the issue is resolved.
Is it OK to erase trouble codes?
While it is generally okay to erase trouble codes after repairs have been made and the issue is resolved, it is essential to exercise caution. Erasing codes without diagnosing and fixing the root cause may mask underlying problems. If the code is related to a previous issue, it could hinder future diagnostics and make it challenging to identify recurring or hidden problems. Technicians should ensure that the repairs are completed, and the issue is genuinely resolved before clearing codes to prevent potential complications in the future.

